Cleaning components
White spirit removes oil and grease. Then remove the white spirit using detergent then rinse in water. Dispose of the white spirit responsibly, or strain it through a filter and use it for cleaning chains. The inside of the fork (the real steerer and the separate bare metal steerer) should be scrubbed clean with a long thin bottle brush, rinsed and dried quickly in a low oven.
Light rust on steel components, especially if chromed, comes off with Barkeeper’s Friend (oxalic acid-based) and a toothbrush. This cannot restore chrome, though, and badly-rusted parts will still be pitted afterwards.
Heavy rust can be removed by soaking the components in a strong solution of warm citric acid for an hour or three, followed by a light scrub with a toothbrush. Follow all the safety precautions on the container, and avoid getting it into your eyes or on your skin. It is non-toxic but can burn. I would avoid soaking the main spring or the rear suspension block in citric acid in case it damages the rubber.
The frame, fork and swingarm can be cleaned with a proprietary bike cleaning fluid or spray, rinsed, and dried indoors. Ensure the frame is dried upside-down so it can drain.
Rubber components – the bellows, main spring and rear suspension block – must be cleaned of any Plus Gas or oil-based lubricants with detergent, then rinsed.
Inspecting components
With a torch, inspect the inside of the frame tubes and fork steerers for serious rust that may be structural. This is unlikely as the steel is quite thick, being a low-strength alloy.
To check forks for straightness, place them face down on a known flat surface so they rest on the tips and the crown. Contact should be made at four points simultaneously, or very close to it. If the fork is bent, it will be obvious.
If the inside of the “inner” steerer is very rusty and rough, clean it with a roll of abrasive paper so it is reasonably smooth. It is not a real bearing surface but the metal coil spring does need to be free to move within it.
The inside of the “outer” steerer must be shiny and smooth. If this is seriously damaged by rust, you need to obtain a better one via the owners’ club or eBay.
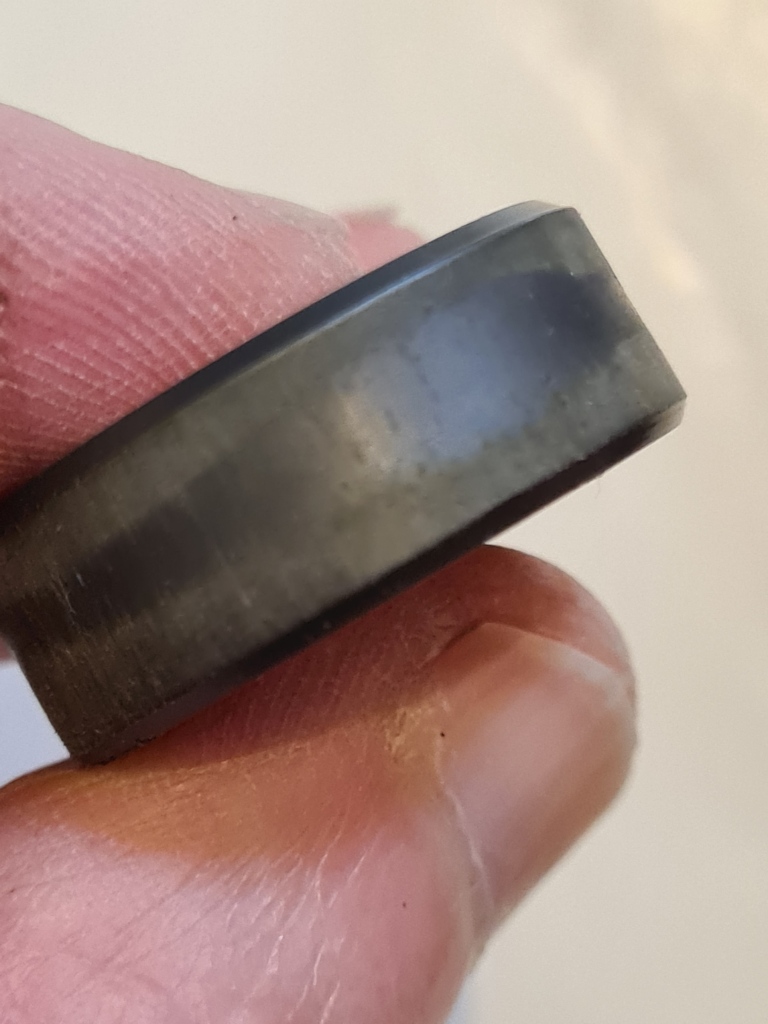
Check the bushes for chipping or damage. The upper bush should measure about 26.0mm in diameter, preferably slightly more. Measure at several different orientations. Shiny patches indicate where it has worn in service. It doesn’t tend to rotate around the steerer, so it can be refitted with the least shiny parts fore and aft, which is where most of the wear takes place.
This is a top bush in good condition, with light wear. It measures over 26.0mm diameter all around. The shiny patch is the most worn area.
Check the headset races for bad pitting. These are normally in usable condition even if the outside is cosmetically challenged. The top races (a loose dark steel insert for the cup and the adjustable screwed race) can still be found on eBay as NOS spares at the time of writing – they were made by T D Cross (TDC) in Birmingham, and were used on other brands too. The bottom races are only obtainable from another Moulton F-frame. Tinkerers may consider fitting a 1 1/4″ headset bottom end, which requires reaming the lower head tube to accept a slightly larger cup. You would need to find a bike shop that has a 1 1/4″ head reamer, which could take time as it has never been a very popular size. The crown race is the same size as the Moulton one but swapping it is a challenge as the outer steerer is the same diameter all the way down; there is no true “crown race seat”.
Check the “ears” of the rear swingarm to ensure the old pivot hasn’t chewed into them. A seized pivot causes the swingarm to rotate on the bolt alone, and the sleeve erodes the ears. Remove any remains of the old rivets from the holes using a small drill or pliers.
Measure the internal diameter of the pivot tube, which should be 5/8″. If the old bushes were loose, they could have turned in the pivot tube along with road grit, and enlarged it.
Check the bellows for any splits. These really need to be intact and, if yours are damaged, try to obtain a new bellows from Moulton Preservation (postal contact only, closed at the time of writing) or through the Moulton Bicycle Club. Apply a good rubber conditioner/preservative to slow down any future drying.
If the frame is to be repainted, check a series 1 rear swingarm thoroughly before you commit to the cost of a respray/powdercoat. Using a drill and a rotary wire brush, clean the paint off the rear fork blades near the suspension block cup, and check the bare steel and braze (if brazed rather than welded) very carefully for cracks. Cracks that have not progressed much can be repaired through the owners’ club, along with additional strengthening of the swingarm. If there are no cracks, some people will still have the swingarm strengthened. My feeling on this is to leave alone and proceed to painting if there are no signs of cracking. There are plenty of unmodified series 1 forks still giving good service, and build quality is the differentiator.
These series 1 forks are not at all cracked after 57 years


Another job to do before painting (restomodders only) is to file out the front fork dropouts to accept a modern 9mm axle. Only file the back, lower, side of the dropout, ensure the end of the slot is well-rounded, and keep checking until the new wheel fits and sits centrally. This means you have to build the wheel first! A nasty surprise may be that the front spacing is not quite 100mm; more like 97 or 98mm. Most hubs have a washer between the cones and locknut that can be removed on both sides, or replaced with a thinner one, to make the hub Moulton-width without stretching the fork.
